Arabic As A Default Language for Your iOS App
This was originally an answer I wrote in our local iOS Developers in Egypt Facebook group.
Sometimes you want to make an Arabic-only app. Or you may want to support some languages, but you want Arabic to be the default app language. Here we see how it’s done, as it’s not intuitive to figure out.
Scenario 1: The app’s single language is Arabic
You may be tempted to layout your views directly in Xcode’s Interface Builder exactly as your design guide suggests. For example, if your design is like the image below, you may decide to put the button on the leading side, and the textfield on the trailing side.

The problem with this approach is that iOS will consider this to be how you want your app to look in Left-to-Right mode. That is, back buttons in the navigation bar stil will be by default on the left, alongside the navigation controller’s back swipe gesture.
So, the better option is to implement it as if your project is localized. That is, Put the textfield on the leading side, and the button on the trailing side. But you may ask, what will flip our views to give us our desired outcome?
Answer: CFBundleDevelopmentRegion
- Open your project’s
info.plistas source code (Right-click -> open as source code). - Look for
CFBundleDevelopmentRegion. You’ll probably find it something like$(DEVELOPMENT_LANGUAGE). Change that toar.
That’s it. Run your project and enjoy your flipped interface.
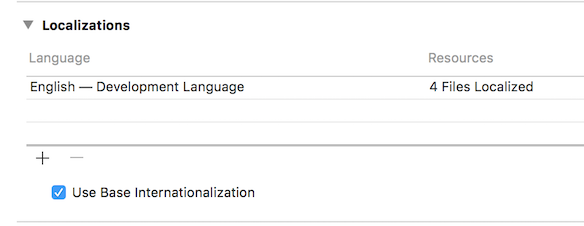
However, I don’t like this approach. As it may leave your project with a somewhat nonesensical project configuration. I mean, if you open your project settings (not target settings), you’ll find these configurations in the Localization section:

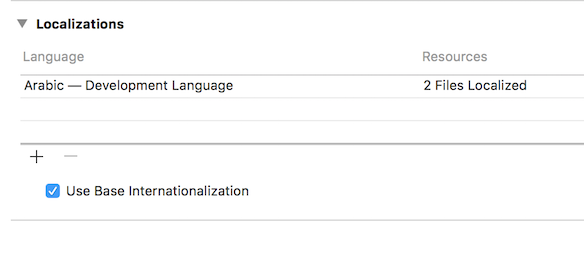
It says English is the development language, while it’s really not the case. While you can remove it, and add Arabic, you dont’ get the - Development Language part infront of it. Also, Xcode will generate Arabic localization files for your storyboars which you probably don’t need.
I prefer the following approach albeit a bit hacky.
Steps:
- Navigate to your
project.xcodeproj. - Right-click and choose Show Package Contents.
- Open
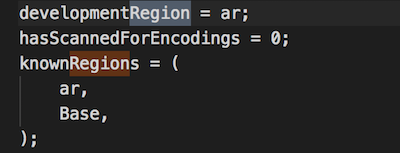
project.pbxprojwith a text editor. ⌘+Fand look for the wordregion. You should find two matches,developmentRegionandknownRegions. Change theenin their values toar, like the image below.

That’s it. You get Arabic as the development language.

Scenario 2: Arabic as first language in a localized app
Your app is already localized. You support multiple languages. But you want the first run of your app to be in Arabic, and the user can change that later. What to do?
Before we begin, it’s better to know how iOS choose the right language for our app. It’s explained here in this official Q&A, but I’ll write the gist of it.
iOS selects the first language in the user’s language preferences list (in General > Language & Region of the Settings application). Then looks in your project for a matching .lproj folder. Such folder contains the relevant .strings files for the localized resource (e.g. Storyboard). Every language you support has a .lproj folder with the language prefix, e.g. ar.lproj, en.lproj, …etc. So, on app start, iOS selects the localization that it sees correct, and doesn’t refer to you (the developer) for such decision.
That is for apps supporting languages in the user’s language preferences list. If the user’s language preferences list doesn’t match any .lproj folders in your app, iOS uses the CFBundleDevelopmentRegion. And that’s basically how things work in Scenario 1 above.
So, our task here is to bypass that preferences list check. Fortunately, iOS seems to store a copy of such preferences list in each app’s user defaults. So if you want tp retrieve it in run-time, you can query it like this:
NSUserDefaults* defs = [NSUserDefaults standardUserDefaults];
NSArray* languages = [defs objectForKey:@"AppleLanguages"];
NSString* preferredLang = [languages objectAtIndex:0];
NSLog(@"Current language is %@", preferredLang);
This is a code snippet from Apple Samples on Localization.
Fortunately, this user defaults entry is writable. So, we can replace that preferences list with one of our own. An array of language identifiers where Arabic is the first is enough for Arabic to be the default, e.g. ["ar"].
So far so good. Now the question left is where to set that new array?
application:didFinishLaunchingWithOptions: is not early enough to set such key. The true starting point of any iOS app is a function called main. It may be unkown to Swift iOS developers, but it’s well-known for those who worked with Objective-C.
In Objective-C projects, you can easily find it in a file called main.m. It looks like this:
Objective-C:
#import <UIKit/UIKit.h>
#import "AppDelegate.h"

int main(int argc, char * argv[]) {
    @autoreleasepool {
        return UIApplicationMain(argc, argv, nil, NSStringFromClass([AppDelegate class]));
    }
}
In Swift projects, it’s a bit weird. As described in Hacking with Swift, you need to delete @UIApplicationMain from your AppDelegate class, then add a file exactly named main.swift. For our purpose, the main.swift file will look like this:
class MyApplication: UIApplication {
    override init() {
        let notFirstOpenKey = "notFirstOpen"
        let notFirstOpen = UserDefaults.standard.bool(forKey: notFirstOpenKey)
        if notFirstOpen == false {
            UserDefaults.standard.set(["ar"], forKey: "AppleLanguages")
            UserDefaults.standard.set(true, forKey: notFirstOpenKey)
        }
        super.init()
    }
}

UIApplicationMain(
    CommandLine.argc,
    CommandLine.unsafeArgv,
    NSStringFromClass(MyApplication.self),
    NSStringFromClass(AppDelegate.self)
)
The bottom part, UIApplicationMain, is explained in the Hacking with Swift article above. What’s relevant to us here is the implementation of the MyApplication subclass.
As you may be already understanding by now, MyApplication is our custom class implementation of UIApplication. So, its init method can be regarded as the very inception of our app; the first milliseconds of our app’s life. Here we can set the AppleLanguages key, and make use of its effect.
In the code snippet above, I do an additional check to see if we’ve done this before; to avoid unwanted repitition.
That’s it. We’re done. It’s finally over.